iTop VPN offers 3200+ VPN servers in 100+ locations worldwide to help you access various sites privately and safely, along with dedicated IP, dynamic and static IP, and Double VPN.
Everyone has sensitive information that requires confidentiality. This article shows you 3 methods on how to password protect a folder on Mac.
There are likely some private files or folders on your Mac that you’d like to protect from unauthorized visitors. Knowing how to lock folders on Mac is a must for you.
In this article, we will show you how to password protect folders on Mac in three effective methods. No one can open some sensitive files even if you leave with your computer on.

Disk Utility is a utility that's built into the macOS operating system that can perform lots of useful and even powerful actions. Using Disk Utility, you can manage internal and external storage devices.
It also allows you to lock folders on Mac by turning them into encrypted Apple Disk files. Here are the detailed steps on how to password protect a folder on my Mac.
1. Create a new folder and move the important items into it.
2. In the Finder, Choose Go > Utilities, and double-click the Disk Utility icon to open it.
3. Select “File” from the menu bar and hover over to the “New Image”
4. Select “Image from Folder” in the ensuing menu.

5. Select the folder that needs to be protected and click the Choose button.
6. Choose the encryption level: either 128-bit or 256-bit.

7. Enter the password and verify it.

8. In the “Image Format” section, select “read/write” from the menu.

9. Click Save to confirm the encryption.
Locking folders on Mac via Disk Utility is like putting the folders in an encrypted vault. However, if you send them to someone else, the recipient will need a Mac device to decrypt them.
Terminal is a great tool for password-protecting a folder, without device limitation when doing decryption. However, it’s a little complicated for first-time users. Let’s learn about how to lock a folder on Mac using Terminal step by step.
1. Control-click on the folder you want to encrypt and select “Get Info”.

2. Find the “Where” section under “General”, and copy the pathname of the folder.
3. Go to Finder > Utilities and launch the Terminal app on your Mac.
4. Type in cd and add a space. Paste the pathname you just copied, and press enter to execute the command.
5. Enter the encryption password when asked and then verify it.

6. Hit Enter key to confirm your action. Now your folder is password protected.
Although Mac offers direct ways to encrypt and password-protect documents, some people might consider these methods to be overly complicated. You can thus employ third-party apps to gain easier access.
Folder Lock is a professional security software that uses 256-bit AES encryption to protect your information with passwords. And it’s very easy to use.
1. Download and install the app when you do pay up.
2. You will receive a serial number and a registration key.
3. Complete the registration process and enter your master password and click OK to confirm.

4. Click the “Lock Folders” on the left menu bar.
5. Click “Add Items to Lock” in the ensuing menu.
6. Select any files that you want to protect and click OK.
That’s it! Very easy!
Everyone would have some confidential information that needs to be protected on the computer. Sensitive financial files, personal documents, or even trade secrets from the work. Adding a password to your important folders is a practice more of us should do.
Passwords provide the first line of defense against unauthorized access. It ensures that your most sensitive files remain secure and safe on Mac.
Besides, there are some occasions when you need to send confidential documents to business partners. Although the files are password-protected, cybercriminals would hack your email and decrypt your business secrets. Using a reliable VPN to build an encrypted tunnel can minimize the risk.
Transferring files over the Internet is par for the course in the business process. It’s fast and convenient. However, some malicious sniffers might take an interest in those files you are about to send. Here are some tips we can take to keep the transmit safe.
Compress and encrypt the folders. The very first thing you need to do is compress and zip the folders into a single bundle and then add a password to it.
Use stronger passwords. Unguessable passwords are necessary. It’s better to use a combination of at least eight letters and various characters, including letters, numbers, and symbols.
Use an encrypted email service. This is an effective way to ensure your files are transferred securely. Unfortunately, most encrypted email services aren’t cross-compatible. Take advantage of it if you and your recipient happen to be available on the same service.
Choose a trusted free VPN. You may maintain the security and privacy of the data transit process by encrypting your connection using a safe VPN. Hackers can’t get into your system and intercept the transfer process.
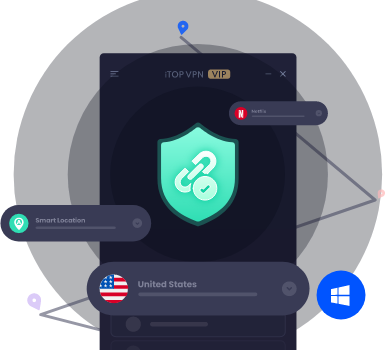
iTop VPN for Mac is a free VPN that encrypts all Internet traffic with military-grade encryption. It helps you stay completely anonymous online by hiding your IP address so that your actions are not monitored or controlled by hackers and trackers.

It puts an extra barrier of security between yourself and others, making it harder for hackers, businesses, governments, and any other 3rd party trackers to see your internet activities, including emails and files you’re sending over the web.
iTop VPN for Mac provides over 1800 global servers for users to choose from, offers TCP, UDP, HTTPS, PPTP VPN Mac connection protocols to help you get the most suitable service, and auto-enables Kill Switch to protect your private data.
Step 1. You need to download and install iTop VPN app on your Mac.
Step 2. Open iTop VPN and click "Smart Location" to select a server that you prefer or let the app select a server automatically.
Step 3. Click the Connect button and wait for the app to create a tunnel for you to transfer files secretly and safely.

What’s more, it cleans privacy traces, removes malware, and fixes other security issues to ensure the highest level of security. Meantime, your identity information would never be logged.
This article mainly talks about different methods how to password protect folders on Mac. These are all effective ways to stop anyone from viewing your important documents uninvitedly. Besides, the iTop VPN is a reliable choice for creating an encrypted and private tunnel for data sharing over the web. It adds an extra line of defense to your confidential data when sent by email.

100+ global countries
3200+ worldwide servers
Dedicated IP addresses
Dynamic IP and static IP

Subscribe to Our Newsletter
Subscribe to our newsletter to stay updated every moment.

Product
iTop VPN iTop Screen Recorder iTop Data Recovery iTop PDF Editor DualSafe Password Manager iTop Easy Desktop Plans & PricingCompany
About Us Contact Us Press Awards FacebookHelp
Support Uninstall Instructions Refund PolicyPartner
Become iTop Affiliate YouTube Creators Free AI Video GeneratorSubscribe to Our Newsletter
Subscribe to our newsletter to stay updated every moment.
© 2025 iTop. All rights reserved.


